Checking for leaks on small cylinder systems has now become an integral part of DVGW worksheet G 612 and therefore is also of interest to private individuals. In this article, we show you how to do the leak check quickly, simply and virtually while you’re doing something else, thanks to the pressure gauge on the pressure regulator.
Post Views:73
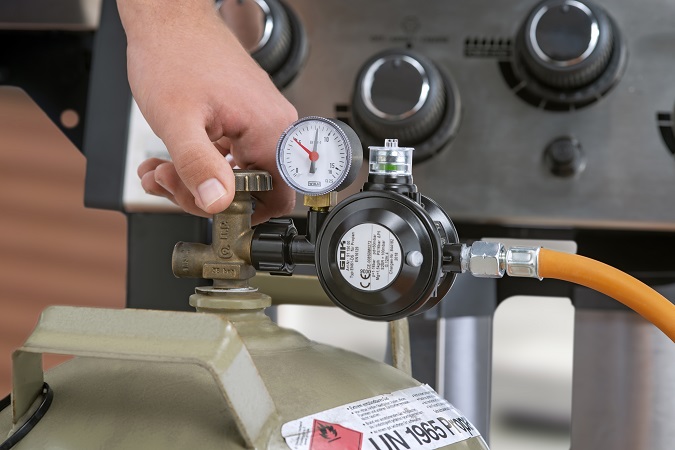
Some people incorrectly view the pressure gauge on the pressure regulator as a gas cylinder filling level indicator. But it definitely isn’t. First and foremost, it is intended to reliably indicate the pressure present in the gas cylinder. If the pressure gauge has two pointers, a black one and a red one, the user can also make using their LPG system safe very easily and quickly.
Quickly checking the entire system for leaks without high-quality technical equipment in an absolutely straightforward manner, and while doing something else in the meantime. Does this sound unrealistic? But it’s true, thanks to a pressure gauge integrated into the pressure regulator. We’re going to do this in the following scenario:
Example scenario
The garden party is in full swing, however the sun has gone down and it will become considerably chillier in the next hour. While the host is still grilling the last steaks on the gas barbecue, his wife is already connecting the gas cylinder to the patio heater.
Leak test with pressure gauge and red pointer
With a maximum of three additional movements, she checks for leaks in the entire LPG system at the patio heater and can still eat her steak in the meantime. We show you exactly how it works:
Close all shut-off fittings on the patio heater
Slowly open the valve on the gas cylinder
Turn the inspection glass of the pressure gauge with the printed red pointer to the exact same position as the black pointer. The black pointer marks the actual pressure
Close the gas cylinder valve again and wait for two minutes to allow any temperature equalisation to take place ⇒ Use the time to load your plate with steak and salad
If necessary, adjust the red pointer to the changed position of the black pointer
Then keep the test time of ten minutes ⇒ Use the time to enjoy your food
The leak check can be carried out thanks to the pressure gauge with its red pointer.
We may have to explain one or two things in a little more detail. On 3: The pressure gauge has a black pointer which shows the actual pressure in the gas cylinder. The red pointer, on the other hand, can be changed manually, as it is printed on the pressure gauge inspection glass. It can be rotated to the exact same position as the black pointer.
On 4:
The LPG is now enclosed in the system to a certain degree. However, due to the ambient temperature or strong sunlight, you should wait for two minutes to allow the temperature equalisation in the gas to take place.
Larger deviation? Leak detection!
If, within these two minutes, the black pointer drifts away from the red pointer due to temperature differences, simply return the red pointer to the position of the black one (on 5).
If the red and black pointers are still in the same position after ten minutes, the system is completely sealed and ready for use. In case of a larger deviation, you should repeat the leak check or look for the leaky connection directly using leak detector spray.
Leak check with pressure gauge without red pointer
Incidentally, the LPG system can also be checked for leaks if the pressure gauge only has a black pointer:
Close all shut-off fittings on the patio heater
Slowly open the valve on the gas cylinder
Manually mark the position of the black pointer (display of the current cylinder pressure)
Close the gas cylinder valve again and wait for two minutes to allow any temperature equalisation to take place
If necessary, adjust the manual marking to the changed position of the black pointer
The articles are written by specialist authors in the fields of LPG, fuel oil, liquid media, tank management and safety engineering, who contribute their expertise from product management, development, technical customer support, training and standardisation activities.
The members of the editorial team have many years of practical experience in the planning, application and further development of technical solutions for the safe supply of LPG and liquid fuels. Several authors are actively involved in specialist committees and working groups of the DVGW, DVFG and figawa, as well as in national and European standardisation committees. The team includes, among others, experts certified in accordance with G 607 and G 608, competent persons in accordance with the TRF, and specialists who contribute to the development and evaluation of technical regulations and industry standards.
In addition to providing information about GOK products and solutions, the editorial team focuses on sharing knowledge relating to safety, regulations, maintenance, operation and future technologies in the field of LPG and liquid media.
Share this post
Related articles
Does the pressure regulator gauge show the filling level of the LPG cylinder?
Camping & Leisure, Grill & BBQ, Home & Commercial
How do I carry out a simplified leak check on an LPG cylinder system?
Camping & Leisure, Grill & BBQ, Home & Commercial
Is it mandatory to have a gas anti-tilt device for outdoor heaters, patio heaters and radiant heaters?
Home & Commercial
You might also find this interesting
How many kilowatt hours correspond to a kilogram of LPG (propane)?
Safety
How does a PRV pressure relief valve work?
Camping & Leisure, Home & Commercial, Safety
Which GOK components do I need as a private individual for my gas barbecue?
Safety
Can the hose assembly for the stove connection set be longer than 40 centimetres when used privately indoors?
Safety
What components do I need to operate gas equipment in the caravan and motor caravan while driving?
Camping & Leisure, Camping & Leisure, Safety
Can I have a German LPG cylinder filled abroad?
Safety
Can I keep the LPG cylinder lying down when using it?
Safety
Can I use a gas-powered heater on my boat?
Safety
Can I also use the red GOK pressure regulators for indoors in the awning or outdoors?
Safety
What do I need a thermal cut-out device “T” (TAE) for?
Home & Commercial, Safety
How does an over-pressure safety device S2SR work?
Safety
Which connections and adapters can you find in an LPG system?
Safety
This blog will never ask members of the public or unqualified persons to make changes to or fiddle around with technical systems themselves.
In accordance with the Industrial Safety Regulation (BetrSichV), a qualified person must take care of a system which requires monitoring.
A qualified person is someone who has the specific specialist knowledge required. This knowledge is gained by way of a professional apprenticeship, corresponding professional experience or current occupational activity.
Please note that the texts are based on information, regulations and standards for Germany. Please always check the rules and regulations in the relevant country of destination and consult specialists if necessary.


